Two years ago, I started to write a series of blog posts introducing incident response triage that evolved out of DFIR talks I was giving at conferences. I got two articles (part 1 & part 2) into the ten-plus article series and other priorities swooped in.
But, now I’m back on the topic (and determined to finish it).
This article is going to start a mini-series focusing on investigating user activity as part of an intrusion investigation. The first two articles in the series focused on big-picture topics, and we are now going to dive into the data.
Let’s get started!
Jump to…
Series Recap
Why We Investigate User Activity
Breaking “User Activity” into Smaller Questions
Why Do We Enumerate the Users?
Where Do We Find The Information?
What Are We Looking For?
User Review in Cyber Triage
Conclusion
Series Recap
Since it’s been a while, let’s quickly orient ourselves in this series before we begin.
Intrusion investigations are about using digital evidence to answer questions about attackers and unauthorized use of computers.
These include questions like:
- Is this computer compromised?
- Was sensitive data accessed?
- What user accounts were involved?
Our overall approach to answering these questions is to break big questions into smaller questions until we have manageable questions we can answer. This is why I call it the “Divide and Conquer” approach.
For example, the general “Is this computer compromised?” question can be broken into 3 (still big) questions:
- Is there suspicious user activity (such as sensitive files being accessed)?
- Are there malicious programs (such as malware)?
- Are there malicious system changes (such as relaxed security settings)?
And each of those three questions can be broken into smaller questions.
The previous post in this series explored the question breakdown process. The remainder of the series looks at these lower level questions about user activity, malware, and system changes in detail.
This post begins a series that is focused on user activity. We’ll then have a series on malware and system configuration.
Why We Investigate User Activity
A large number of attacks involve compromised credentials. Phishing attacks lure employees into entering their passwords into fake sites, the attacker then uses the captured information to log into the corporate network. Or, the attacker somehow gets access to an endpoint and then grabs passwords from that endpoint.
Once the attacker has a legitimate login and password, they may not need malware. They may be able to log into the network and blend in with normal traffic and activity.
So, user activity needs to be involved with any intrusion forensic investigation.
Breaking “User Activity” into Smaller Questions
As we talked about above, our overall approach is to take big questions and break them into smaller questions. So, we’re going to break the question “Is there suspicious user activity on this computer?” into 3 questions:
- Who: Which users were active on this system?
- When/Where: Are there suspicious logins to the system? If so, from where and when did they occur?
- What: What did the users do when they were logged into the system?
This article focuses on the, “who.” We’ll cover the other questions in the next posts.
Why Do We Enumerate the Users?
The first step in investigating users on an endpoint or server is to know which users have used the system. This is an important first step when you get a new computer to investigate.
After this step, you may have an initial list of suspicious user accounts and a basic idea about the number of users the computer had.
Let’s consider some scenarios:
| Scenario | What to Review |
|---|---|
| Only one system administrator and one user ever logged into this system. | The primary user account could be involved, and you’ll want to look for anomalous behavior: activity at odd hours, suspicious login locations, or malware running under their account. |
| Several accounts were recently using the system, only one of which was the primary user of the system. | The other accounts should be reviewed. Perhaps the attacker has taken over those accounts and is laterally moving around the network by remote desktopping between computers. |
| Dozens or hundreds of accounts are actively using the system. | This could be a remote desktop server that is used by a company to grant employees access to the internal network. In this situation, it could require extensive context about each user and their role to determine what is normal for them. |
Having a basic idea of user count and access is a good first step to approaching the problem.
Where Do We Find The Information?
On a Windows computer, the registry is the primary source for information about users. The SAM hive lists the local and domain accounts that have logged in.
When a user is deleted from the system, it is deleted from the SAM hive too. So, if you want an exhaustive list of anyone who ever logged in, you’ll need to look for past traces. Examples include event logs that refer to past users or directories in “C:Users” that do not correspond to active users.
What Are We Looking For?
There are several reasons why we’d consider a user account to be suspicious and, by the end of the user sub-series, we’ll have covered them. But, for the scope of looking at basic account information, we’re looking for a few things:
| Number of Users | As I mentioned before, it can be useful to get a basic idea of how many users were on this system. 1? 3? 100? Is that number expected for the role of this computer? If not, we’ll start to look at the activity in the unexpected accounts. |
| User Names | Most companies have a naming convention, such as the first letter of the first name and the full last name (jdoe). Or, both first and last names separated by a “.” (john.doe). You should look at the user names to see if any stand out as being abnormal for the company. |
| Administrator Rights | Every organization should limit which users have administrator rights. You should identify the set of users on the computer that have administrator rights and confirm that the set makes sense. Perhaps an attacker has granted admin privileges to a normal user so that they can more easily control that endpoint without needing additional malware or exploits. |
| Local or Domain | Most organizations have an approach to creating accounts as either local- or domain-level users. Some may have all domain users. Some may have local accounts for granting administrator-rights. Other point-of-sale (POS) systems may have all local accounts. You should review the accounts for anything anomalous for that organization. An attacker could have created, for example, a local account using the organization’s naming convention. |
| Account Creation Date | The dates on which the account was created could be relevant. Accounts that were recently created, especially if the date is similar to other indicators of the attack, should get an extra review. We’ll deal with login dates in a future post. |
After reviewing the basic information of users who have logged into the system, you may have a list of suspicious accounts to dive more into.
In follow up posts, we’ll look into examining them more to see when and how they logged in and what they did on the system.
User Review in Cyber Triage
If you are using Cyber Triage (either the free “Lite” version or the paid one), you can easily see the list of users and find the information listed above.
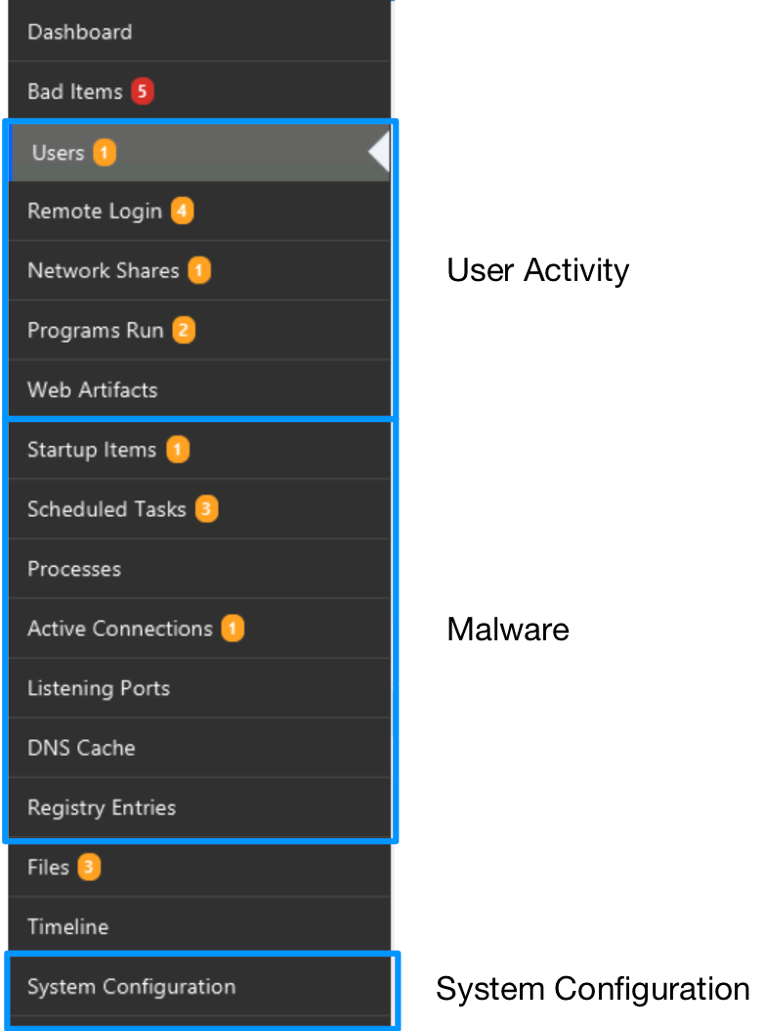
The navigation menus on the left-hand side of Cyber Triage are organized based on the same ideas that this blog series uses. The first items are all about users. The next set is about malware. The last is about system configuration.
To review the list of users on the system, you just need to select “Users.”

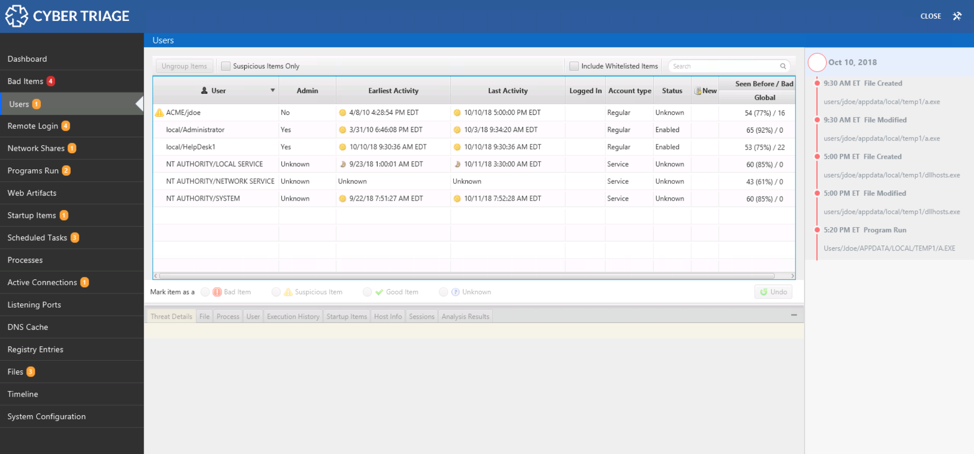
Users Table
The table on the top provides a list of users and associated metadata. This is based on information in the registry and from inferring accounts based on event logs. Here is an example row for the ‘jdoe’ account on the domain ACME. They do not have administrator rights, and the account is 8 years old.

You can review the data for all of the criteria we just talked about, including naming conventions, administrator rights, creation date, etc. You can compare the creation and activity dates with the timeline of known activity on the right-hand side.
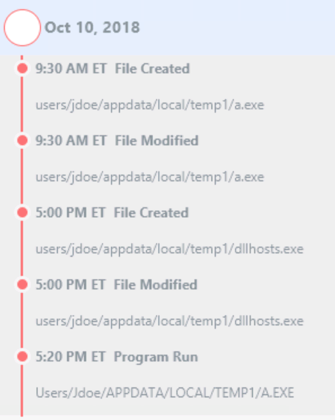
In this example, we can see that this jdoe account logged in right before the file activity in AppData.
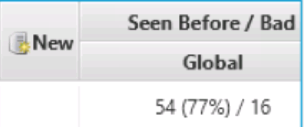
The table will also tell you if the user account is new since the last time you analyzed this host and how many other hosts that you previously collected data from also have that account. For example, in the screenshot below (repeated from above), this account is not new and has been seen on 54 other computers.
Getting Context
The bottom area, the “Related Information” section, allows you to get more details about the user.
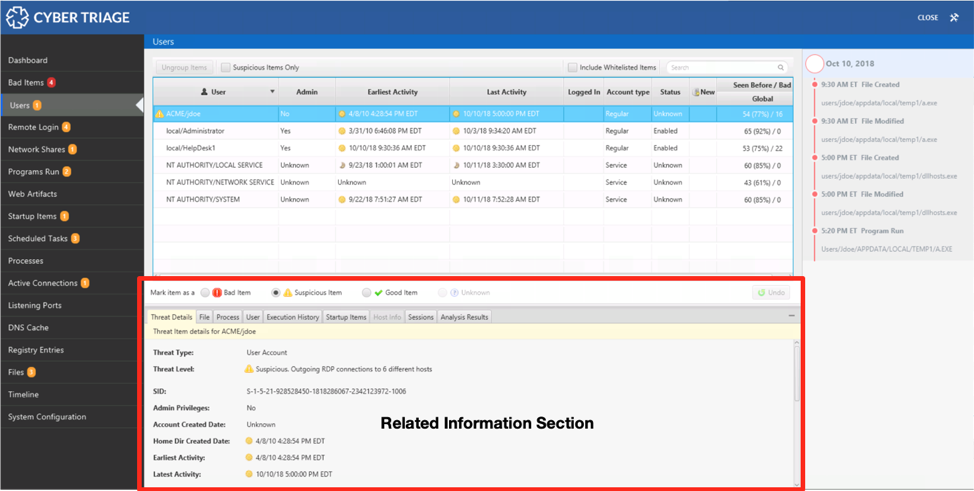
From here, you can see when the user typically logs in, what processes they were running at the time of collection, what programs they executed, where they logged in from, etc. This area helps you more quickly decide if the account is suspicious or not.
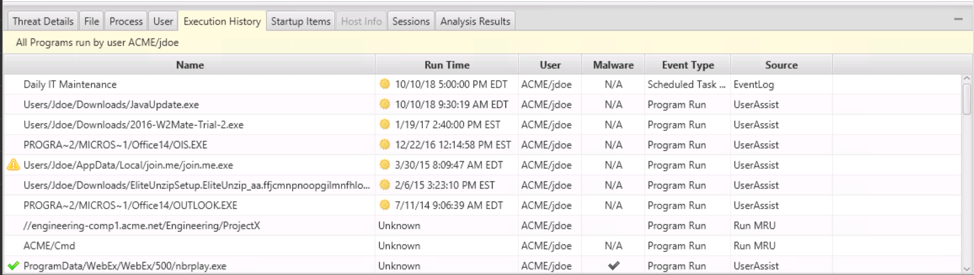
For example, we can look at data from UserAssist, Prefetch, etc. to see what programs the ‘jdoe’ user account executed.
It’s important to note that the information you are seeing at the bottom of the screen can also be found in other views of Cyber Triage, so you don’t need to conduct your entire investigation in just that bottom viewer.
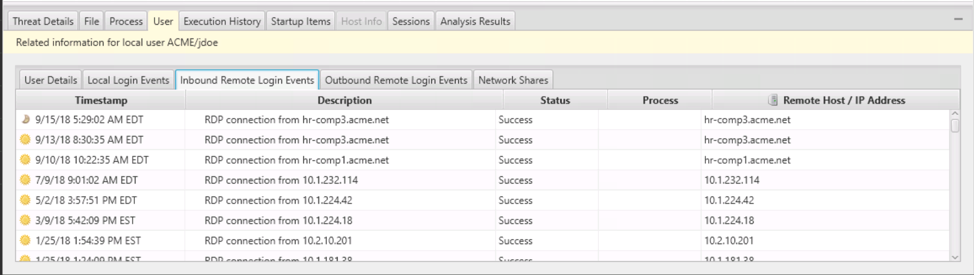
For example, you can see remote logins for a given user in the bottom.
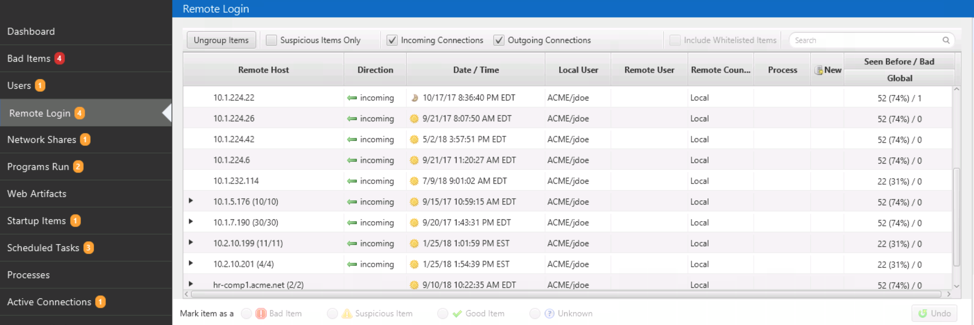
But there is also the top-level “Remote Login” view that shows similar information grouped by remote host. This view makes it easier to spot anomalous remote login activity, such as those coming from unique hosts (but that is the topic of the next post).
Use the bottom area as a quick reference to get more context about a given user.
Documenting Your Findings
If you conclude that a user account is compromised and involved with an attack, you should mark it as “Bad” using the icons below the table. In this example, this HelpDesk1 account was created by the attacker.
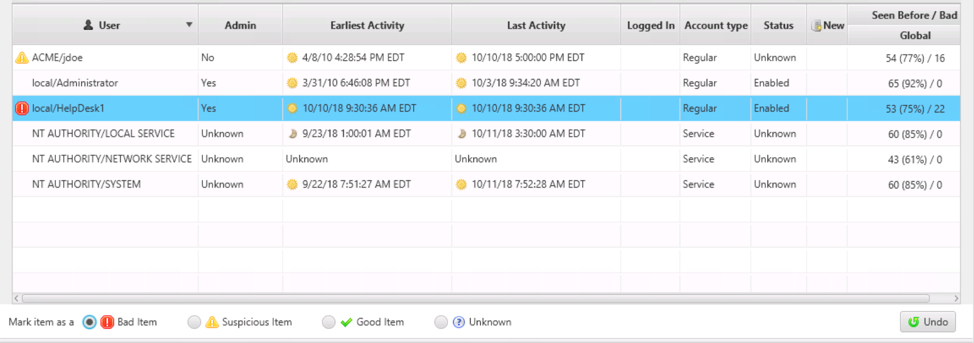
If you think an account is suspicious but don’t yet want to commit to marking it as “Bad,” then mark it as “Suspicious.” It will then be highlighted so that you don’t forget about it.
Conclusion
Because investigating an endpoint is a big challenge, it needs to be broken into pieces to be tackled effectively. This post reviewed the basics about users on a system and what makes a user account suspicious.
The next two posts will also focus on a user’s login activity and their behavior when they were logged in.
If you’d like to try Cyber Triage to answer questions about users or malware, download a free evaluation copy here.