In this post, you’ll learn how to approach the “Orient” phase of OODA during your investigation.
Let’s get started!
Jump to…
Series Recap
Orienting During Investigations
Confidence Level
When to Stop
Example Scenarios
Conclusion
Series Recap
Our previous series, “Intro to IR,” focused on breaking up larger digital investigation questions (IQs) into smaller investigative questions. It focused on questions such as “Is there evidence of malware persistence mechanisms?” and “Are there suspicious user accounts?”
This series is about making the numerous decisions that need to occur in that process using the OODA loop. OODA is a decision-making model that is natural to many people but also formalized to help optimize processes. It consists of four phases that continue to repeat and provide feedback. The idea is to quickly iterate through them faster than your adversary, enabling you to make decisions and answer your IQs faster than them as well.
There are several other articles about using OODA in incident response, but we are focused at a micro-level on endpoint triage. In other words, the process that we use to investigate an endpoint for an intrusion.
What’s OODA again?
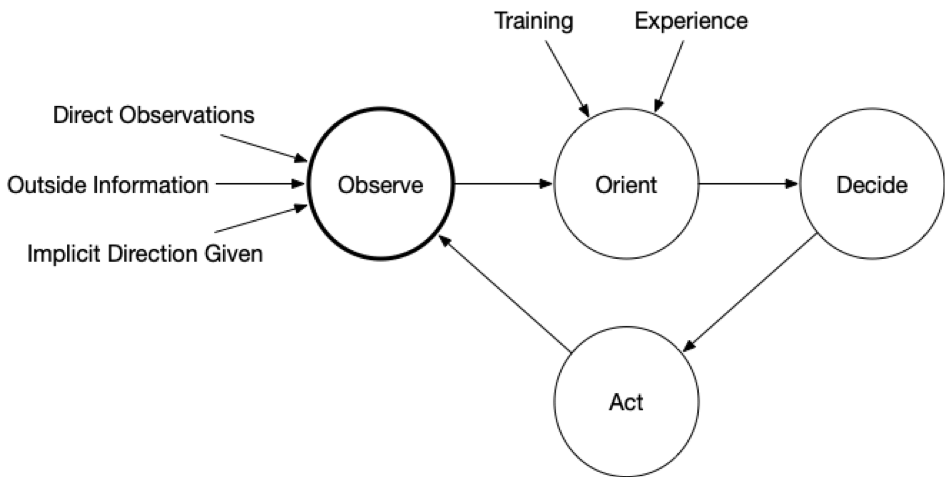
OODA is an acronym with four repeating phases:
- Observe: Observe the situation using a variety of sources that are available. You will never be able to collect all data before making your first decision. In the last post, we talked about endpoint and network visibility.
- Orient: Use your experience and training to make sense of what you are seeing so that you can answer your IQs. Make hypotheses about the answers. This is the focus of this post.
- Decide: Based on your goals, orientation, and timing needs, decide on what action to take and when. Actions could include testing a hypothesis about the current state (i.e. get more data) or trying to change the predictions about what will happen next (i.e. thwart an intruder).
- Act: Implement the decision.
The impact of the action (and at all stages) should be observed and fed back so that a new orientation can be made and another follow-on decision and action.
Here is a rather generic OODA diagram:
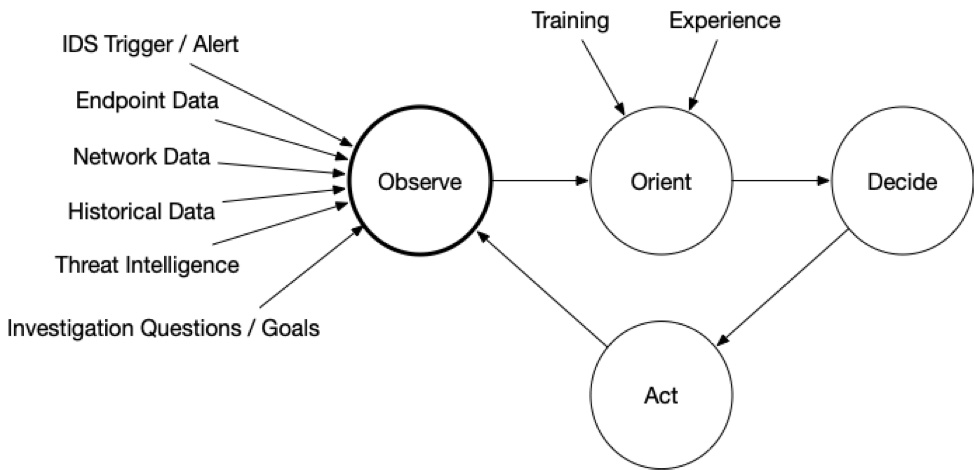
 Now, here is one that is more endpoint-focused:
Previous Series Posts:
Orienting During Investigations
During endpoint triage, the goal of the orientation phase is to make hypotheses about the IQs you are trying to answer based on the previously observed data.
For example, if the question is “Are there suspicious processes on this computer?” and you are able to observe the list of processes, then the orientation phase is where you review the processes and conclude with “Yes,” “No,” or “Unsure.”
There are often 2 significant challenges with the orientation phase:
- Too much data to observe and reason about.
- How to spot the evidence when the intruder is trying to blend in.
Let’s review each of them.
Too Much Data
In the last post, we discussed the importance of gaining endpoint visibility to collect data for observation. Once you have that access, you need to make sure you’re focusing on what’s relevant because you may end up with a fire hose of data coming at you.
It’s important to:
- Keep the IQ in mind.
- Identify where data exists to support those questions (refer back to the Intro to IR Series for examples of malware, user accounts, etc).
- Focus only on the data that is relevant to the questions. Ignore the rest until your IQs broaden or change.
For example, if your IQ is about suspicious processes, start by reviewing only the running processes and ignore other data (such as startup items and scheduled tasks).
Your tools should allow you to focus on and search for certain data types.
When doing this, you may decide that you don’t have enough relevant data. That’s OK. You can complete this round of the OODA loop and decide to collect more data.
Knowing Normal
In general, the data you need to answer your IQ is about what the intruder has done. You’re trying to find the unauthorized logins amongst the authorized ones. Or, the malicious scheduled task amongst the benign ones. When every system is different, it can be hard to identify the malicious and suspicious items.
The following can help with identifying suspicious data:
| Threat Intelligence | This will have information from ongoing incidents and actors. You can use this to compare with what you are seeing to identify files and network data that is similar to other known incidents. |
| Historical Data | If you have baseline data from the system, you’ll be able to focus on the new items. If you have data from other endpoints in your environment (or from other environments), you can use that as a reference to better know what is “normal.” |
| Automated Analysis | Perform an in-depth analysis of the collected data based on previously seen intrusion data. Look for signs of malware and other malicious programs that go to great lengths to hide. |
Confidence Level
During the orientation phase, you’ll be formulating answers to the investigative questions. You need to be keeping the confidence of the data in mind because that will play a role in the later decision-making phase.
You need to know if you have high confidence about the item being associated with an intrusion (or whatever you are trying to answer) or if your confidence is lower and maybe it’s a false positive.
To circle back on the previous example, let’s look at some confidence values for the above techniques.
| Scenario | Confidence Value |
|---|---|
| Several reputable malware-scanning engines report that an executable file is malware based on its MD5. | High-confidence result because it is unlikely that several reputable engines falsely flagged it. |
| The file name looks like a random string and matches a threat intelligence pattern. | Could be high confidence because it was random. |
| The file name was standard (such as “update.exe”) and matched threat intelligence. | Lower confidence because many applications use the name “update.exe”.
|
Many automated tools provide some level of confidence via their scoring system. The higher the score, the more confidence the tool generally has that the item is malicious.
Consider Alternative Hypotheses
You can increase your confidence in the answer by making sure you think about other explanations for the data you observed. You should always be looking for both data to support and refute your theories to prevent confirmation bias.
For example:
- If you find password dumping tools, could they have been placed there by an internal security team?
- If you see remote desktop connections coming from an unexpected range of IP addresses, were there network topology changes that may explain them?
DFIR Software
It is REALLY hard to stare at a text file showing running process names and hash values and decide that one is suspicious. You need the software to compare with past data, threat intelligence, and do further analysis to be able to reason about what you are seeing.
Returning to the previous example, looking for suspicious processes, if we have a list of running processes, then we can use:
| Threat Intelligence |
|
| Historical Data |
|
| Automated Analysis |
|
When to Stop
It’s always important to know when to end so that you don’t get into analysis paralysis. You should move on when you’ve stopped making relevant and significant progress for the data that you have.
| Scenario | Next Step |
|---|---|
| You realize you don’t have enough data to make a good conclusion. | Move on so that you can “Decide” in the next step to collect more data. |
| Your confidence in your IQ answer is high, and you’ve thought through alternative theories for the observed data. | Move on, and maybe your next decision will be to act on that answer or to collect more data to try and disprove the current theory. |
| You have some external pressure to make progress no matter what. | Try moving ahead to the Decision step with your best theory. Hopefully, the lack of confidence in your answer will impact the decision-making process so that you don’t end up turning off internet access to the entire company on a low-confidence conclusion.
|
Example Scenarios
Let’s go back to the two examples we saw in the previous post. Note that to make these a bit more relevant, we’ll include discussion of the other 3 OODA phases besides just Orient.
Scenario 1: Suspicious Network Traffic
We had a trigger about suspicious network traffic from a laptop, and we want to answer the question of “What process sent network traffic to the remote IP?” We collected a list of open network connections using Cyber Triage.
So, our Observation sources were:
| Trigger | IDS Alert. |
| Scope | What process was communicating with the IP? |
| Sensors | List of active connections via Cyber Triage. |
| Historical | Data from other endpoints that were previously analyzed via Cyber Triage. |
| Threat Intelligence | We have access to file reputation via Cyber Triage. |
To Orient, we do not have a data overload problem because we were able to collect just open network connections.
We review them and realize that none are to the remote IP we were investigating:
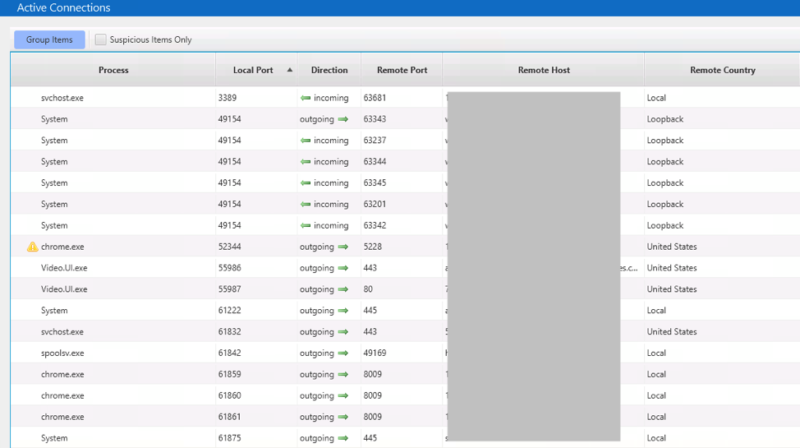
So, we can’t directly answer the initial IQ about what process sent the data. It’s either that the process has terminated or closed the connection, but those are both low confidence because we have no data to support either conclusion at this point.
How to Test Your Theories
There are a few ways to test these theories:
- Look for malicious or suspicious processes and then focus on those as being likely candidates that made the previous connection. This could include a memory search to see if any had a reference to the given IP
- Look for malicious or suspicious programs that were startup items, triggered tasks, or programs that were somehow run to see if something malicious was run in the past
- Look at the DNS cache to see if the computer previously resolved a hostname to the IP address.
With these concepts in mind, the next Decision phase can choose what additional data to collect or search. Perhaps we collect all data mentioned above (in the Action phase) and then iterate through the loop to Observe again:
Note that there is a balance between minimizing endpoint data collection and having to go back and get data several times.
Depending on how fast your collection tool is, you may end up waiting to get the additional data about running processes and startup items. It may be faster to make sure you get all of that up front and then you have more data to reason about.
Scenario 2: Compromise Assessment
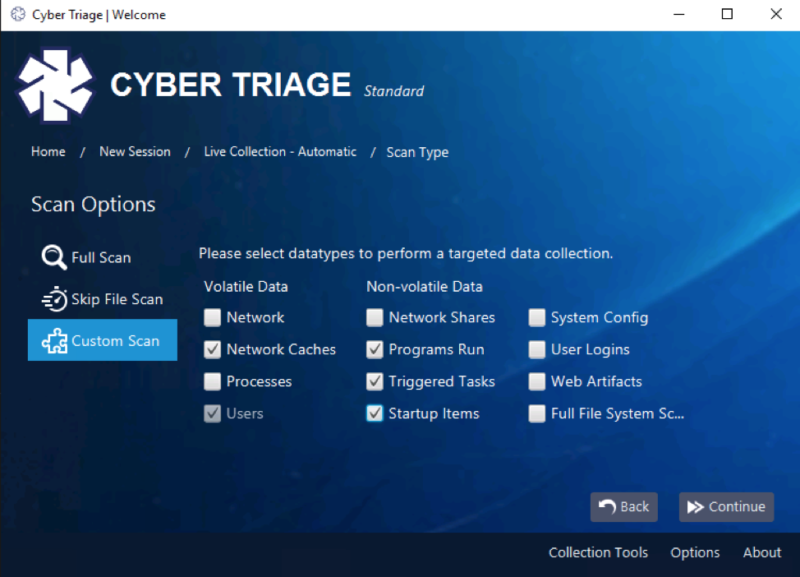
We’re investigating an executive’s laptop to determine if there are any signs of compromise. It is a proactive assessment. We decided to first focus on the easy things and had the following to observe:
| Trigger | None. |
| Scope | Are there possible malware persistence items or suspicious user logins on the CEO’s computer? |
| Sensors | Malware and user-related login data was collected using Cyber Triage. |
| Historical | We have not collected from this host before, but we do have data from other computers stored in the Cyber Triage database. |
| Threat Intelligence | We have access to file reputation via Cyber Triage. |
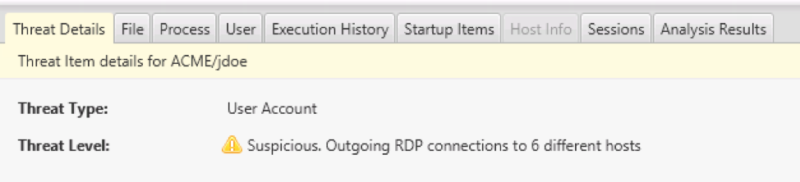
As we saw in the last post, Cyber Triage analyzed relevant executables using Reversing Labs and didn’t find any suspicious startup items, WMI actions, etc. It reviewed the logins and flagged the executive’s user account because it had many outbound RDP connections:
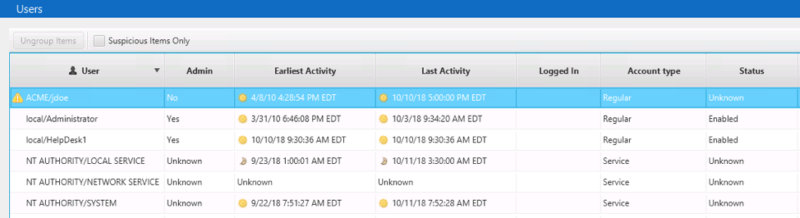
Details for the executive’s account shows:
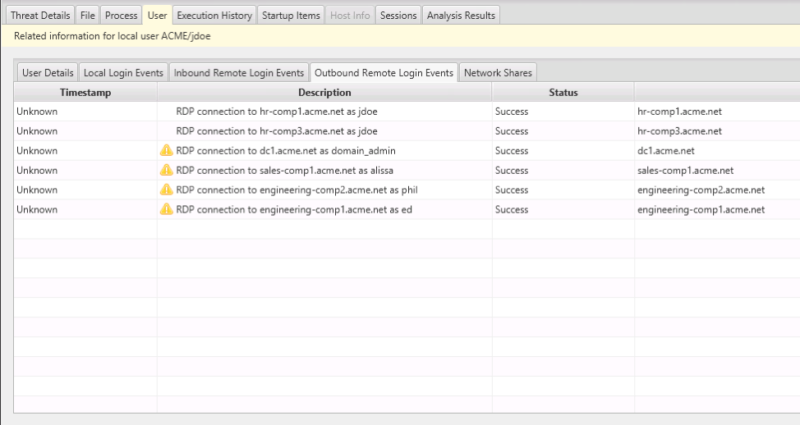
And we can see which hosts those were:
What We’ve Learned
We now need to orient around this data.
| Threat Intelligence / Experience | The user account was flagged because it has several outbound RDP connections, which can occur when intruders are moving laterally around the network. |
| Confidence | Cyber Triage marked this as “Suspicious” and not “Bad” because it doesn’t have the highest confidence that it is nefarious. There are alternative explanations. It’s possible that the CEO needed to remote desktop to other computers. |
| Normal | We need to understand how normal it is to remote desktop into these computers. Perhaps the network is very segmented, and it is common to remote desktop to different domains to perform certain tasks. Or, perhaps there is no segmentation, and it was an intruder looking at different computers. |
So, to go back to our initial IQ, we did not find evidence of malware persistence but do see some potentially suspicious user logins. We have a low to medium confidence theory that there could be lateral movements.
In the following Decision phase, we should decide to get more information to understand if this activity was from the CEO. Likely by talking to her and understanding what these other computers are for.
Conclusion
In order to quickly investigate and triage an endpoint, it’s important to quickly orient yourself around all of the possible data. It’s important to remember the questions you need to answer, keep confidence levels in mind, and seek alternative theories. Once you have your possible answers to the question, the Decision phase will help you take action (like getting more data or remediating).
Cyber Triage provides visibility into endpoints using its Collector and uses Automated Analysis to help investigators make decisions faster. You can try Cyber Triage free for 7 days.
Next post… How to Decide during Investigations.