Linux systems that are suspected of being compromised need to have data collected from them for an investigation. One common way to do that is using the open source Unix-like Artifact Collector (UAC). We recently introduced UAC support into Cyber Triage and wanted to share the basics of how to use it.
The output of UAC is a collection of text files. To more quickly review them, you can import them into Cyber Triage, which will parse them and process them with its automated analysis pipelines.
In this post, we will cover:
- UAC Basics
- How to deploy UAC
- Options to save the results
- How to import the data in to Cyber Triage
UAC Basics
UAC is an open source static collection tool designed to collect key forensic artifacts from *nix systems, including Linux. The UAC collector is built around a single shell script (which is why it is portable across so many Unix type platforms), but depends on many configuration files.
The basic steps to collecting with UAC are:
- Prepare any needed network services to store the output, such as SFTP or S3.
- Get the TAR file that contains the script and configuration files onto the Linux system.
- Launch the collector as root and specify what to collect and where to save results to.
We’ll cover each of these in more detail in the later sections.
UAC uses profiles to determine what should be collected, which are simple .yaml files that can be customized. Although the standard profiles are going to be suitable for most situations. The three standard profiles are ‘full’, ‘ir_triage’, and ‘offline’.
UAC can save results to a local file or upload to S3, Azure, SFTP, or IBM Cloud.
UAC has excellent documentation to provide more details beyond the overview we provide.
Trusting System Executables
It is important to note that by default UAC will be using binaries on the target system for collecting all the artifacts. If you are investigating a compromised system it is possible that the threat actor has modified some of the standard binaries in order to conceal their installed malware.
In order to address this you can include trusted binaries with the UAC archive. However this is a non-trivial exercise, and in order to be fully trusted the binaries should be statically compiled so they are also not dependent on libraries on the target system. This is a tedious task to say the least!
If you do want to include your own binaries (dynamically linked or static) they can be placed in the /bin directory in the appropriate directory for the target operating system. There is more information on this in the documentation, which can be found here: https://tclahr.github.io/uac-docs/#using-your-binary-files
Static vs Adaptive Collectors
We recently posted on static vs adaptive DFIR collectors:
- Static collectors rely only on a set of rules
- Adaptive collectors start with the set of rules and then collect additional files based on what they parse
UAC is a static collector, but it has some broad rules that allow it to collect hashes of many executable files.
Deploying the Collector
In order to deploy UAC you will need to transfer the .tar.gz archive to your target system, unpack it and then launch the collection. A simple collection process could involve:
- Downloading the latest release, in the example below it is pulled directly from the github repository:
% curl https://github.com/tclahr/uac/releases/download/v2.8.0/uac-2.8.0.tar.gz -o uac-2.8.0.tar.gz
- Unpacking the archive
% tar -zxvf uac-2.8.0.tar.gz
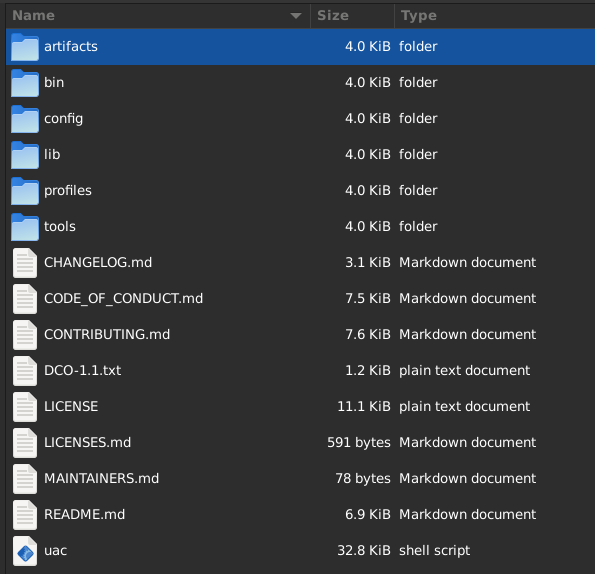
Once unpacked you will see a directory structure like this:
- Change into the newly created uac directory
% cd uac-2.8.0
- Run the collection as root, with the ‘full’ profile, and saving to the current directory.
% sudo ./uac -p full .
Choosing Where To Save The Artifacts
UAC provides a number of methods by which the collection file can be automatically transferred from the target system, provided it has internet access. By default a .tar.gz file will be saved to the target system, this will then need to be manually collected if another option is not used. Available alternatives are SFTP, Azure, S3 and IBM cloud. Which option works best for you will most likely be a matter of what is already available within your existing infrastructure.
When configuring your upload system we recommend creating a dedicated ‘collection’ user account, and setting the permissions on the upload destination to write only. This will help protect the uploaded files in the event that the credentials are compromised as it will not be possible for the account to view what has already been uploaded.
UAC Profiles
All configuration files in UAC are text based and fairly simple to read and edit. There are three key concepts to understand when creating a custom collection, profiles, artifacts and collectors.
- Profiles are stored in the profiles directory and contain a list of artifact files (or directories containing multiple artifact files) to be used.
- Artifacts are stored in the artifacts directory, and contain subdirectories for different groupings of artifacts. Each artifact file contains a list of collectors.
- Collectors contain details of the specific artifact or information to be collected, this includes a description, supported operating system, path to the artifact and the command or method by which the artifact is preserved. There are also a number of other optional configurations for a collector depending on the type of collection being made.
By default UAC ships with three profiles, full, ir_triage and offline.
- full: Collects all available artifacts.
- ir_triage: Collects the same volatile data as a full collection, but does not include files relating to applications and browsers.
- offline: Same files as full, but does not do volatile data.
Data in the Full Profile
The data collected by UAC can be broadly categorized into two groups, static files and volatile data. Volatile is collected by calling native commands, this makes UAC portable across multiple operating systems and distributions with little to no additional configuration by the user. However it does introduce some risks, which are discussed later. For a quick overview of what is collected you can check the profile file you intend to use in the uac/profiles directory. Each line in the profile file points to artifact files in uac/artifacts, so if you want to dive deeper you can also examine these files. At the time of writing (2024-05-16 & UAC v 2.8.0) the default collection profiles include 473 Linux collectors.
Some of the information that is collected includes:
Running processes
Extensive information about running processes is collected, including process file tree, process status and the contents of /proc
File information
The lsof command is used to identify open files on the system (at the time of collection). A bodyfile is created, this includes files details that can be used to create a timeline. Hidden files and directories are identified, along with potential security concerns such as world writable files and directories.
Network configuration and status
Multiple commands are used to identify open and listening network connections, firewall configuration, adaptor settings (including assigned IP addresses), open network files and ARP tables.
System Information
A wealth of system configuration information is collected, ranging from service configuration to a kernel audit settings. Other information includes user logons, operating system and kernel version, loaded modules (similar to windows drivers), memory information and date and time information.
Packages
Packages are used to manage installed software, a list of all installed packages is collected.
Storage
Details of mounted and connected storage devices are collected.
Containers
Containers are used to distribute software in a self contained package, that include required libraries and configuration files, avoiding potential version and dependency issues on the target operating system. UAC searches for various types of containers, including Docker and LXC.
Malware scan
Chkrootkit is used to search the system for known rootkits and malware.
Hashes of executable files
A search is conducted for all files marked as executable on the system and MD5, SHA1 and SHA256 hashes of these are recorded
Key configuration, user and log files
Key files are collected, and the directory structure preserved. This includes user related artifacts such as browser history and caches, command history files, chat programs such as slack and skype and remote management tools such as team viewer. System log files from /var/log, along with web server log files and the configuration files from /etc (excluding shadow password files). The key difference between the FULL and IR_TRIAGE collections is the number of files collected, with IR_TRIAGE excluding application and browser related files.
Loading UAC collection into Cyber Triage
You can load a full UAC collection into Cyber Triage. Cyber Triage will:
- Parse the files created by UAC to create artifacts
- Process the artifacts in the automated analysis pipelines, including sending executables for malware analysis
- Present the artifacts in the UI along with scores
Before you can import the UAC collection, you need to unpack the TAR file.
Windows 10 and Windows 11 both have tar included in the standard install, so you can simply open a command shell, navigate to the case folder containing your UAC collection.
cd cases\exhibits
create a folder to contain the output
mkdir <HOSTNAME>-UAC
Switch to created directory
cd <HOSTNAME>-UAC
Unpack the archive
tar -zxvf ..\uac-www-20240426125735.tar.gz

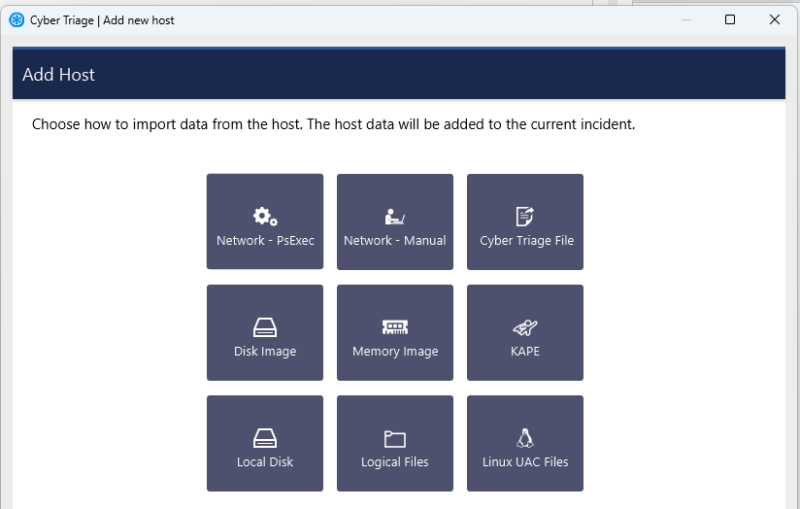
Then go to Cyber Triage and use “Add Host” to add the UAC collection to your incident.
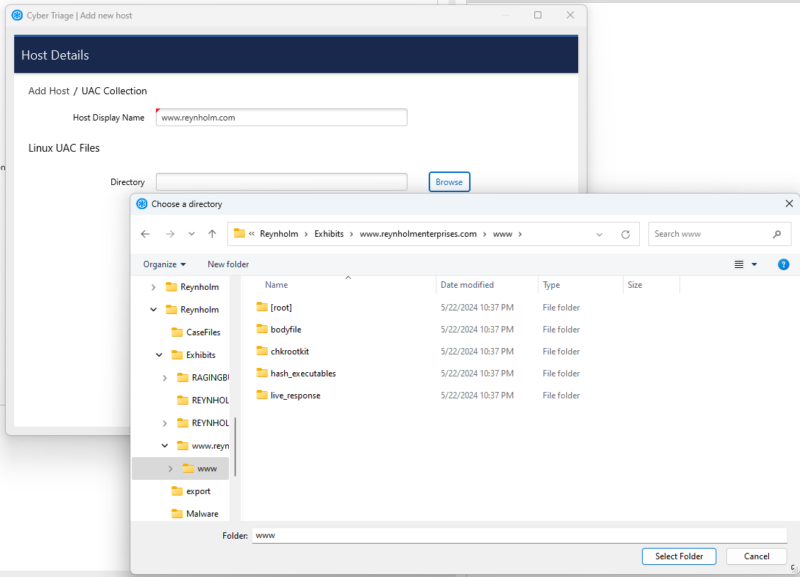
Choose Browse and navigate to the root UAC folder, which should contain a ‘bodyfile’ folder.
You can also watch a demonstration video here:
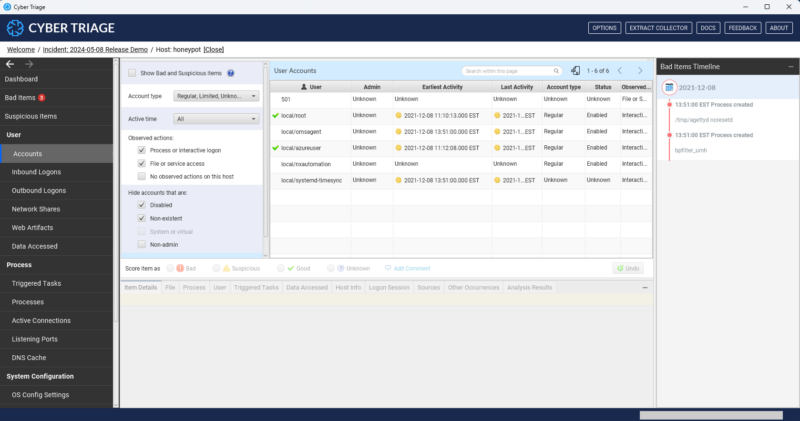
Once the data has been imported, you will have access to:
- The artifacts that Cyber Triage extracted from the UAC files (such as processes, file hashes, network information and user accounts)
- The original source files (such as the raw /etc/password fie) in the “Files” section
Conclusion
UAC is a great open source project that allows for the efficient collection of data from Linux and other Unix-like hosts. It allows you to easily extract key files from a system for later analysis.
If you are looking for a faster and more comprehensive way to analyze the extract files, then try Cyber Triage. You can download a free one week trial version here: https://www.cybertriage.com/download-eval/


