When an incident is detected, it’s important to quickly start collecting DFIR artifacts. In this post, we will look at how to efficiently collect the data you need using CrowdStrike Real Time Response and show how to integrate Cyber Triage. EDRs alone do not have all of the data you need for an investigation, especially if the attacker was using EDR evasion techniques.
Cyber Triage’s adaptive collection tool ensures you get all of the artifacts you need for an investigation.
Why You Need More Data than Only CrowdStrike
When many companies first get an Endpoint Detection and Response (EDR) system, such as CrowdStrike Falcon, they think their incident response needs are 100% met since the word “Response” is in the name. They soon realize this is not the case.
EDR is great for basic alert validation, isolating the system, and basic remediation, but it’s not the only investigation tool you need during an incident.
Some specific reasons you need more than just an EDR:
- Attackers know how to avoid EDRs and, therefore, you should assume the EDR could be missing something.
- EDRs only have the data that they use for detection, but your investigation may need to go beyond that.
- EDRs have limited data retention policies and the incident may have started before your EDR telemetry data rolls over.
- EDRs want low false positives and this leads to missing important artifacts that could be relevant to your investigation.
And, if you don’t believe us that you need more than just what an EDR provides, you need only to refer to the EDR documentation. They all allow you to integrate additional DFIR collectors, which showcases that they know they don’t have everything.
So, the best practice is to deploy a DFIR collector to ensure you have all of the data you may need to investigate an alert or incident.
Collecting Artifacts with Real Time Response
The Real Time Response capability of CrowdStrike gives you a prompt on a remote system and with that you can deploy and run scripts.
There are some basic Real Time Response concepts to keep in mind:
- It has a central “library” where you can store files (scripts, executables, configuration files, etc.) that will be pushed to the endpoint when a response is started.
- You can use the command prompt to push and pull files from the endpoint, but each file must be less than 4GB.
- Files are pushed to the root “C:\” folder, so you will need to save any output data to a different temporary location.
- Falcon will kill the session after no user activity for 10 minutes (even if a script is still running) or after a script runs for more than 30 seconds.
So, if you want to use RTR to run additional tools to collect DFIR artifacts, the basic process would be:
- Add the tools into the library
- Start a Real Time Response session and manually launch the commands
- If they create local output files, versus sending the data over the network, then you need to manually copy the files back.
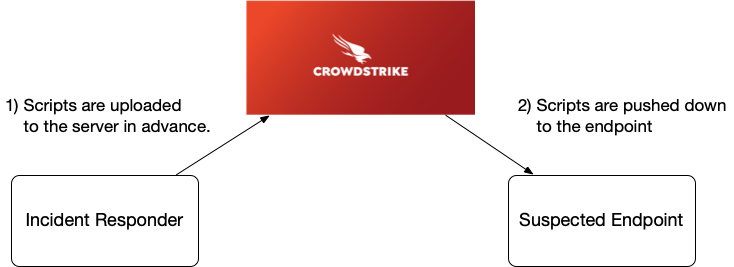
Deploying Cyber Triage Collector with Real Time Response
The Cyber Triage Collector is a great way to get more information for your investigation. It’s a comprehensive collection tool that gets source files, executables, dlls, and lots of other artifacts. Results can be saved to a file, uploaded to S3, or sent to a waiting network server.
A common setup in a corporate environment is to use the EDR to launch the Collector, which sends data back to the waiting server.
Because the Cyber Triage Collector is a single Windows EXE, you have two choices for using Real Time Response:
- You can put the Collector into the Real Time Response Library and launch it with the needed arguments as long as you can change the timeout. Otherwise, it will be killed after 30 seconds.
- You can put a pre-configured Deployer Script in the library and launch it. This will in turn launch the Collector as a different process that will keep on running even when the script is killed after 30 seconds (though we recommend extending the timeout in this situation too).
There are detailed instructions in the User Manual, but the basic steps are:
- Edit the Deployer script based on your environment. The default settings are to download the Collector from the cybertriage.com site, run it with default settings, and save the result to a local file. You may choose to have the data sent up to S3/Azure or a server.
- Upload the script to the CrowdStrike RTR library.
- Launch the script using the UI.

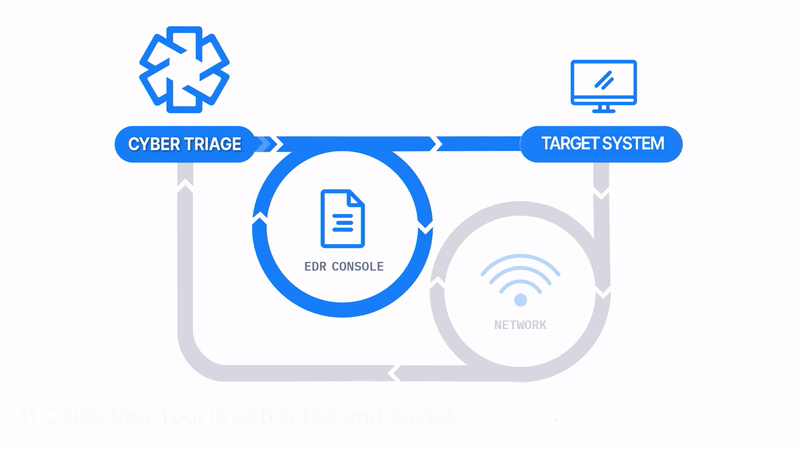
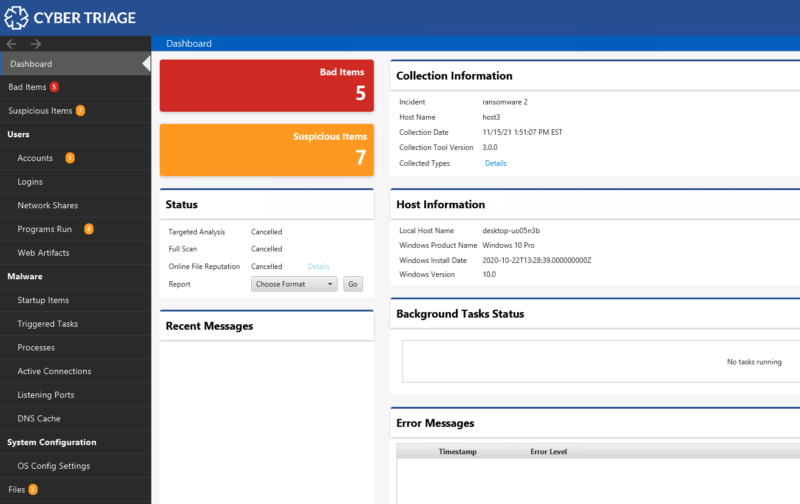
You can then open the collected data in Cyber Triage, which will have performed automated analysis on it and identified artifacts as bad or suspicious. This method is much faster than going through a set of text files manually to understand what the attacker did.
Integrate Today
If you are already a Cyber Triage and CrowdStrike customer, then try out the integration today and contact support if you have any questions. If you are looking to get more data from CrowdStrike, then try out Cyber Triage using the evaluation form. Our team is available to help anyone with their integrations.