This post starts a new series about using Cyber Triage Lite, which is the free version of Cyber Triage. It’s been out for a while and this series is going to spread some knowledge about how to use it in case you are looking for a free DFIR solution.
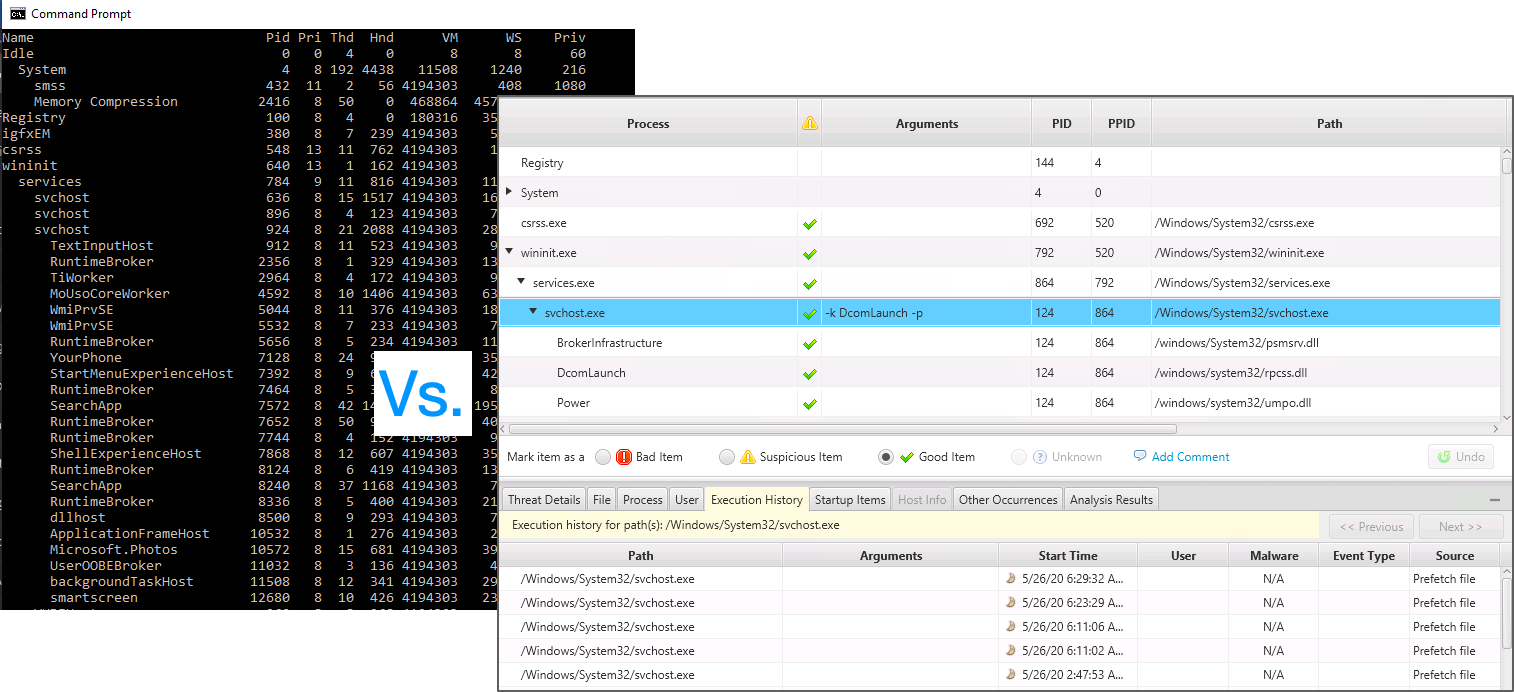
Cyber Triage Lite allows you to collect files and artifacts from Windows systems and review them in a UI. There are many other collection tools out there, but they often involve several executables and libraries and simply give you a folder of text files. You’ll see that Cyber Triage Lite’s collection tool is a single executable and gives you a nice UI to navigate.
This first post dives a bit more into Cyber Triage Lite and then we’ll talk about collecting to a USB drive or network share.
If you’d rather watch videos instead of reach, go to the Videos section below.
What is Cyber Triage Lite?
Cyber Triage Lite is a DFIR collection and display tool. It runs on a live system, disk image, or memory image and extracts artifacts and files of interest. It does not make a full disk or memory image.
The collection will pull back data such as:
- Startup Items (i.e. Autoruns)
- Processes
- Users and Logins
- Scheduled Tasks
- Etc.
The Cyber Triage Collector is unique in that it will parse the registry and other files on the system so that it can resolve and collect executables. It will recursively follow links until it gets to a file. You can read more about it here.
The artifacts are saved to a JSON file, which is then imported back into the Cyber Triage UI. You can then review the collected data, tag them, and generate reports.
If you compare Cyber Triage to other existing free DFIR tools, you’ll find:
- It’s a single EXE collection tool rather than dozens of files and libraries.
- It recursively collects executable files and resolves anything with a path to a file.
- It has has minimal dependencies, such as not requiring “.net”
- It’s got a UI that allows you to tag items and pivot to jump from a startup item to a running process.
- It can generate reports.
How is it different from Cyber Triage Heavy?
Well, we don’t really call it Cyber Triage “Heavy”. But, if we did, then the difference between the Lite and Standard versions is that the Standard adds:
- More collection methods. Namely entirely over the network, S3, EDR integration, and batch imports (coming in 3.2).
- Scoring to identify which artifacts you should start your investigation with
- Recommendation engine help you identify additional artifacts to look at
Basically, the standard of Cyber Triage has analytics to make you faster.
Why Should You Use Cyber Triage Lite?
If you are setting up a new DFIR lab and looking for a free collection toolkit, then you’ll be factoring in features such as:
- How hard is it to deploy and run the collection tool
- How hard is it to review the data and find the suspicious artifacts
- How can you include the data into your report.
On each of these respective topics, Cyber Triage:
- Is easy to deploy and run since it’s a single executable
- Provides a UI that merges in various artifacts so that you don’t need to remember the difference between Prefetch and AMCache.
- Provides a UI that allows you to start with a process and then correlate with other data (such as execution history and startup items).
- Allows you to tag artifacts and include them in a report.
If you already have a free collection toolkit and are having some growing pains from any of the above topics, then maybe Cyber Triage is a better solution.
But, I should point out that Cyber Triage Standard is a great deal at $2,500, will make your team more efficient with its scoring features, and gives you easy access to 40+ malware scanning engines.

Basic Cyber Triage Workflow
To help set the context, let’s start talking about the basic workflow of using Cyber Triage.
- Collect: Use one of several techniques to get data from a target system into the Cyber Triage application.
- Review: Use the Cyber Triage UI to review the data and look for suspicious artifacts. Tag as needed.
- Report: Generate an HTML report of your findings.
We’ll discuss in this article about using the collection tool to save artifacts to a USB drive. Later articles in the series will focus on other collection methods, viewing the data, and making reports.
Data Types Collected
It’s critical for a responder to know what kinds of data are being collected. To keep this blog post a reasonable length, I’ll outline here the broad types of artifact categories that you’ll see in the UI.
These are all based on our free DFIR Divide and Conquer course.
- Users:
- User Accounts: What accounts existed or were referenced on the system
- User Logins: Inbound, outbound, and local login sessions.
- Network Shares: UNC paths that were accessed or mounted.
- Programs Run: Programs that were run on the host.
- Web Artifacts: Web history, downloads, and cookies.
- Malware:
- Startup Items: Programs that start each time the computer starts or a user logs in.
- Triggered Tasks: Programs that are scheduled tasks or WMI actions.
- Processes: Processes that were running at the time of collection
- Active Connections: Network connections that were active at the time of collection
- Listening Ports: TCP and UDP Ports that were open at the time of collection.
- DNS Cache: DNS Cache entries that existed at the time of collection.
- OS Settings
- Configuration: OS Settings that may be changed by an attacker.
These types are how the UI in the application is organized and what level of control you have over the collection tool.
The original ‘source files’, such as registry hives and event logs, are also collected and can be exported from the tool.
Getting Cyber Triage Lite
You can download Cyber Triage Lite from the website.
You’ll get an installer that will also allow you to evaluate the paid features for 7-days. After the 7 days, it will change to only the free features in the Lite mode.
Installing Cyber Triage Lite
There are two programs that come with Cyber Triage:
- The main application that will run on your trusted analysis system. This is the ‘.msi’ installer that you download from our website.
- The collection tool that runs on the live target system. You will get this from inside of Cyber Triage once you install it.
So, the first step is to install Cyber Triage using the downloaded .msi file. Simply use the defaults and launch the program.
USB to USB-based Collection (or network share)
Now that we have Cyber Triage installed, let’s talk about doing our first collection. We’re going to run the collection tool from a USB drive and save the results to the same USB drive. You can do the same thing with a network share if you’d like.
Live Collection Scenario
First, let’s talk about when we need this feature.
You’ll often need to get data from a live running system. Sometimes you can do this entirely over the network and other times you need to have manual interactions with the system.
The Standard version of Cyber Triage allows you to perform the collection entirely over the network, but the free Lite version does not.

In this scenario, you are going to run the Cyber Triage Collection Tool from a USB and save the artifacts to the same USB drive. You can also use a network share instead of a USB drive.
You’ll then bring the USB drive back into the main Cyber Triage application. The data can be encrypted during this process.
This situation comes up when:
- You’ve unplugged the computer from the network
- You’re a consultant and send the collection tool to your client to obtain data
- The security team does not have admin credentials on the endpoints
It’s not ideal for large scale investigations, but it often happens. So, you need this capability.
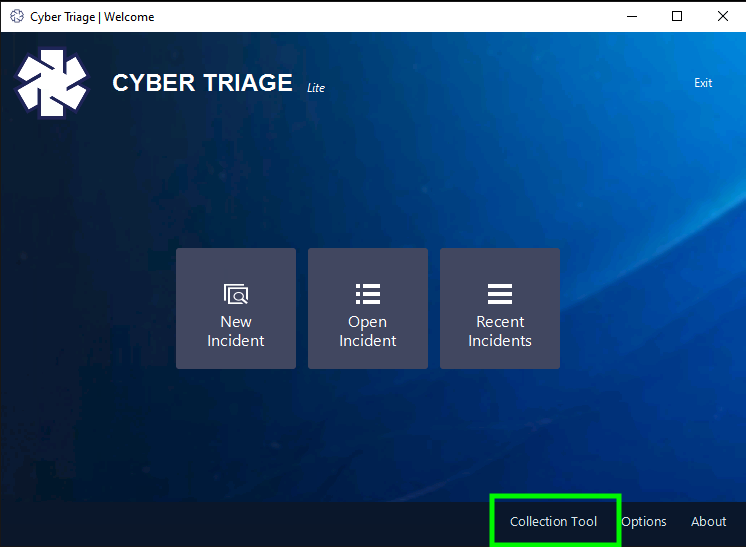
Getting the Collection Tool
First step is to get the collection tool. You can get that from the “Collection Tool” button at the bottom of the opening window.
That will prompt you for a location to extract the collection tool to. You’ll get a folder such as this:

You’ll want to copy this folder to a USB drive (or network share) and launch these programs from the system you want to investigate.
Launch Using the Command Line
The CyberTriageCLI.exe program is what knows how to analyze the live system and bundle up the artifacts. You can open a command prompt and launch it (or double click on it).
If you give it no arguments, it will collect from the system it runs on and save the results to the folder it was run out of.
That’s the easiest way to collect. Simply insert the USB drive, double click on CyberTriageCLI and wait for it to finish.
You may want some more control though, such as:
- If you want to select what kinds of data to collect
- If you want to encrypt the output
To do that, you’ll need to figure out the needed arguments. You can use the ‘–help’ argument to get the list of options.
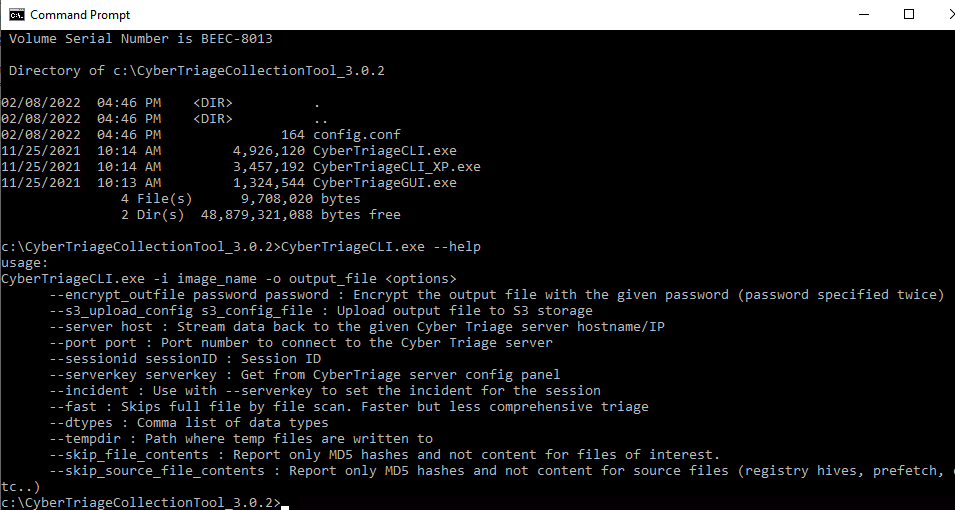
To use them, you’ll need to open a command prompt and type them in.
Using the GUI Tool
Or, you can instead double click on the CyberTriageGUI.exe program, which is a basic UI wrapper. It will turn whatever UI settings you pick into a command line.
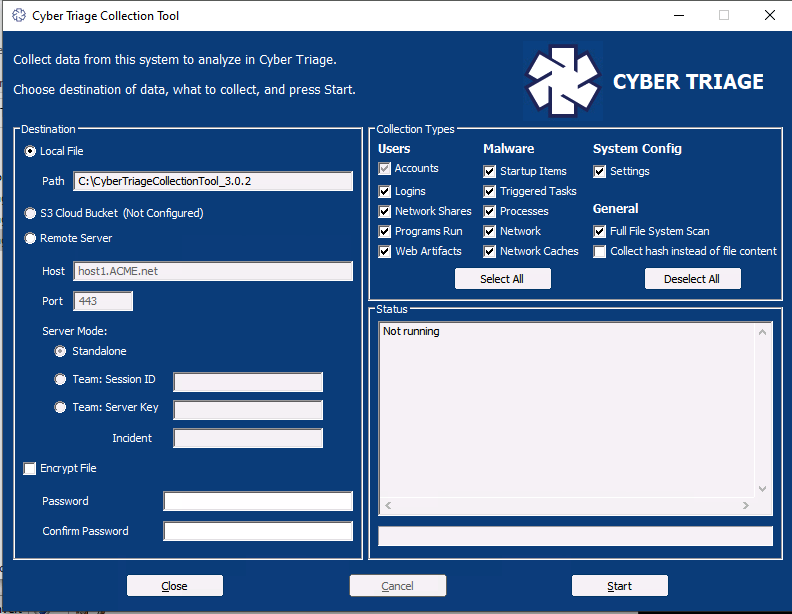
Here, you can pick if you want encryption and what kinds of data you want to collect. When you press “Start”, it will launch the CyberTriageCLI.exe tool and you’ll see the output in the Status box.
Finding the Output
Regardless of how you launched it, the output will be a folder with a compressed JSON file in it named cttout.json.gz.
That’s the file you need to get back into your main Cyber Triage application.
Adding the Data into Cyber Triage
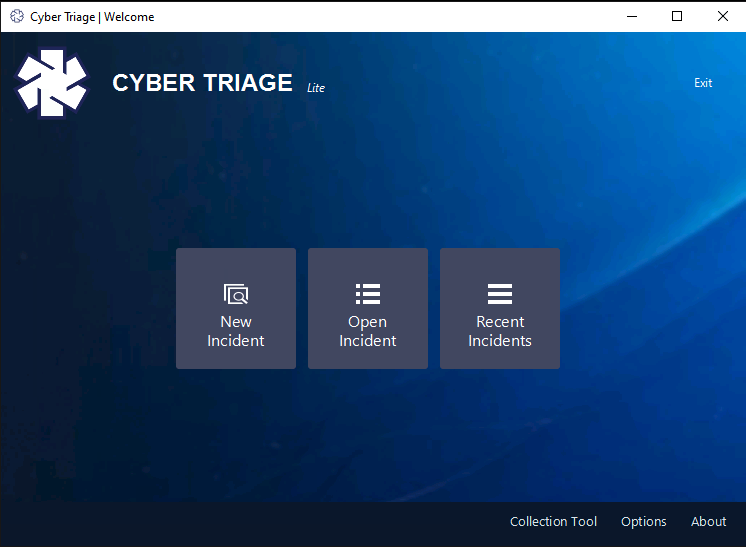
Once you’ve brought the data back to your trusted computer running Cyber Triage, then choose ‘New Incident’ and either enter in a name or choose the default time-based name.
That brings you to the Incident Dashboard where you can see the hosts in the incident. At this point, there are none.
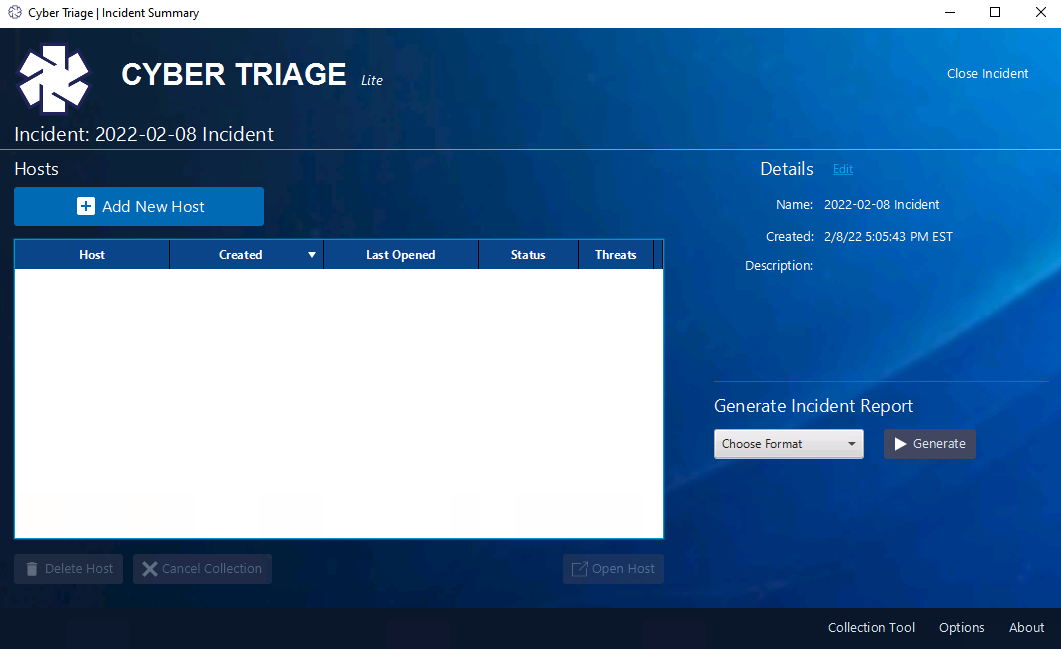
So, choose “Add New Host”.
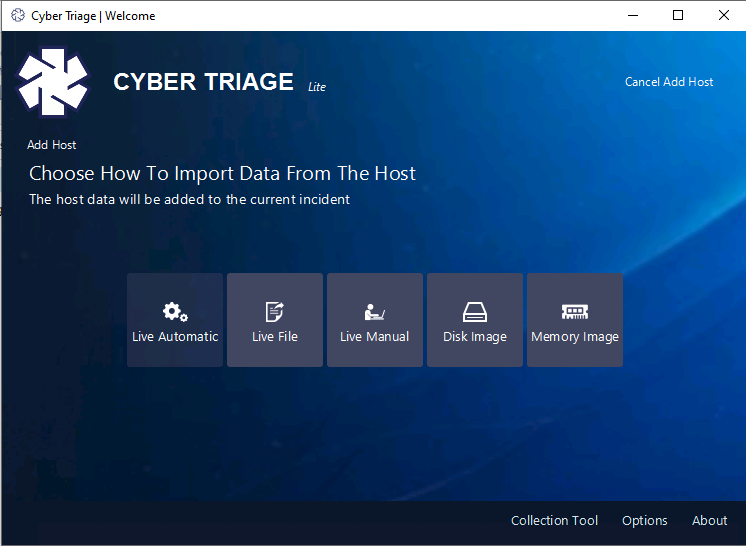
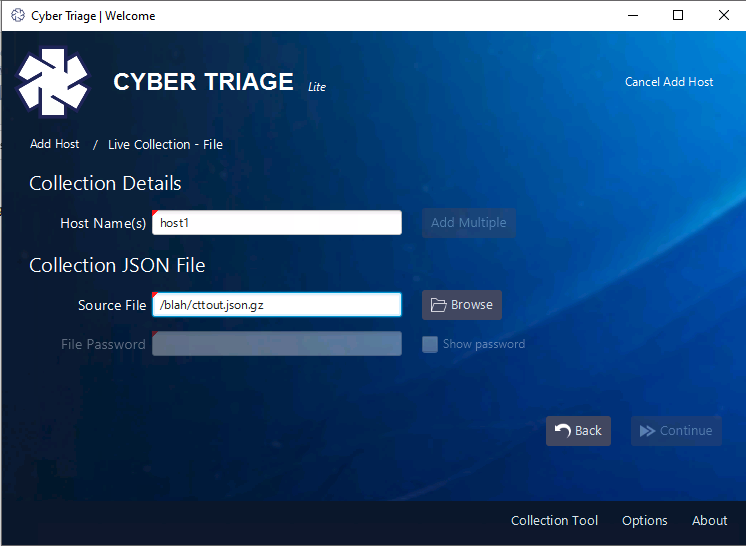
We’ll cover more about each of these boxes in a later blog post, but what we care about for now is the “Live File” feature. Choose that and it will prompt you for a host name and path. Navigate to the cttout.json.gz file that we collected from the target system.
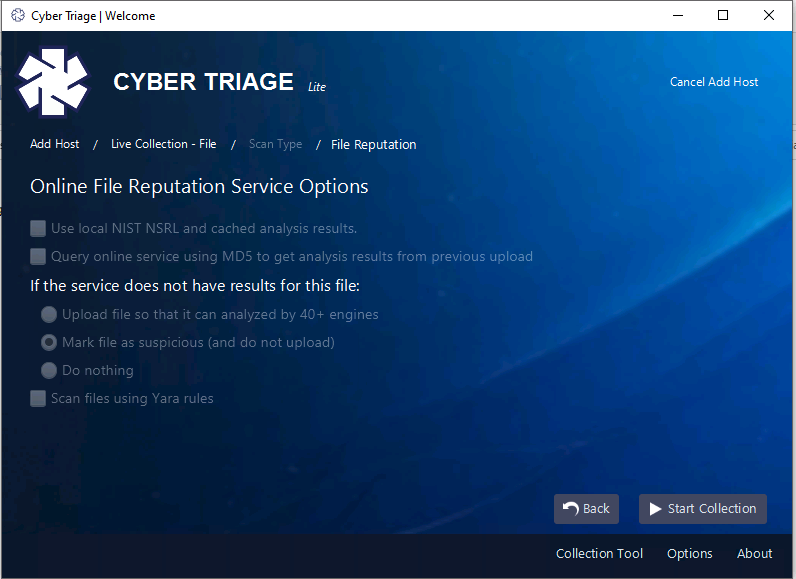
After this panel, you’ll be prompted for malware analysis settings. This feature is not enabled in the free Lite version, so you can ignore this panel and press Start Collection. In other versions of Cyber Triage, this is where you’d pick how to use data from 40+ malware scanning engines.
Once you press “Start Collection”, then Cyber Triage will parse the JSON file, save it to a database, and present the data in the UI. We’ll talk more in the next blog post about reviewing the results, but they’ll look like this. Below is the user accounts table.
Try it Out
Download Cyber Triage Lite from this form. During the first week, you’ll get some malware scan results and analytics, but those will stop after 7 days.